Monday, December 10, 2012

Bruce Willis Bust - part 2

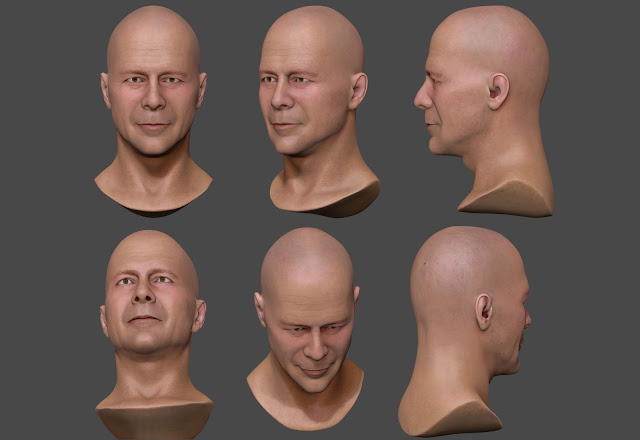
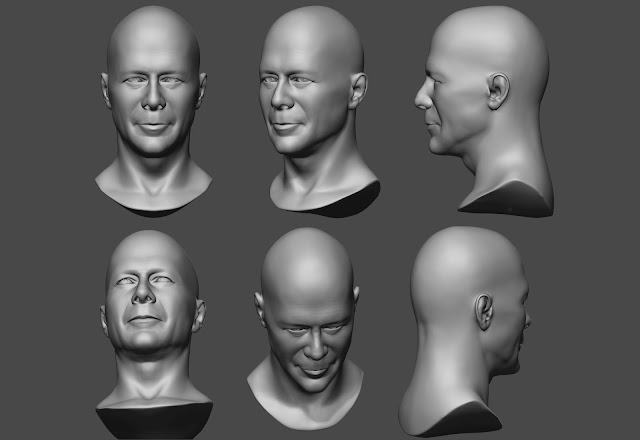
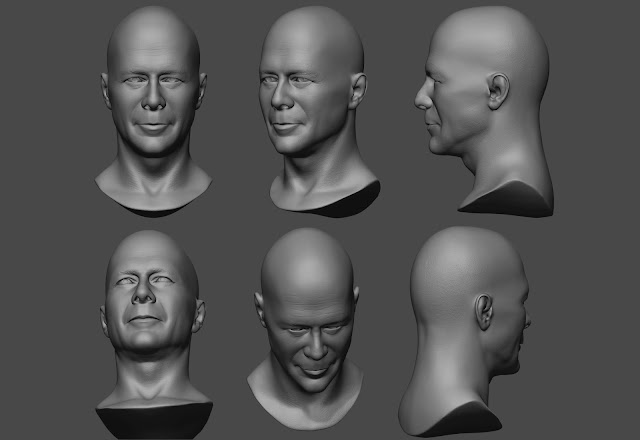
I finished sculpting and texturing the model. Here are a few ZBrush renders (the eyes are temporary).

Sculpt only
Sculpt with displacement map
Sculpt with displacement & diffuse maps
Next, I am going to bring the model into 3ds Max, add a proper eye mesh, set up a SSS (sub-surface scattering) material, and finally have my beauty render.

Saturday, December 01, 2012

Bruce Willis Bust

Right now I am working on a Bruce Willis bust for the ZBrush class I am attending at CG Protege. The bust is the project at the end of the class, so I want to create something decent for my portfolio. Here is the sculpt render at more or less final state (click for a larger image).
Bruce Willis bust sculpt
The (more or less) final sculpt

I am rather happy with the model; I think I get some degree of resemblance. I spent around a month on the model, most of it spent tweaking details. Here is a series of snapshots of my process.

I (and all other students in the class) started with creating a base model in 3ds Max. I personally found this step the most uncomfortable step mainly because I had so many questions unanswered, such as:
  • How square do the polygons need to be?
  • What is the polygon count I am going for?
  • What topology is good for sculpting? I cannot imagine a head model without a point shared by 5 polygons (instead of the ideal a point shared by exactly 4 polygons).
Perhaps this is what classes are for: just going in with best guesses and came out of the process with better guesses. So here is my base model.

The base model
After sculpting on the base model, I find there are too many polygons on the model. I learned that the base model should be fast and easy to modify, so it should have low polygon count.

Topology-wise, I find the mouth problematic. There are too many polygons at the end of the lips (where the upper & lower lips meet) that I needed to spend time redistributing polygons while sculpting.

Another minor point is having a simpler topology for the ears. I thought topology will guide me during sculpting (which may be true for other people), but I ended up fighting the very topology I spent time creating.
The first draft
I spent a week sculpting the first draft. Dmitry, the class instructor, pointed out that the resemblance was weak. It was hard to accept his feedback (myself at fault here); I needed a night to cool down. The three quarters view (the second one from the left on the image above), having the least "Bruce Willis" feel, helped me to convince myself that I could improve the model.
The second draft
A week later I had this second draft. (I was also working on the texture in parallel.) I basically toughen up the look:

  • I made the muscles in the cheek look as if he is grinding his teeth.
  • Skull shape is now more squarish.
  • Neck is wider; the clavicle bones are more defined.
  • The brow is stronger/thicker.
At this point, I think I was concentrating to get specific angles right that I actually hurt the overall look. I got frustrated because the three-quarters view just did not get better.

In a coincidence, Jose, the drawing & design instructor at CG Protege (also a colleague of mine at Tiny Island, so I got to know him from going to lunch together), dropped by and helped me with more feedback, mainly on the ways Bruce Willis head breaks the rule of ideal proportions, such as:
  • His eyes are wide horizontally. If we draw a vertical line from the inner end of his eyes down towards the nose, the line ends up inside the nose rather than just touching the edge of the nose.
  • His lip line is rather low from the bottom of the nose; around halfway between the bottom of the nose and the bottom of the jaw.
  • His upper lip is very, very thin from front view.
  • His forehead is especially large.
Jose also remarked that I over-detailed the jaw. While simplifying the jaw, I noticed that on side view, the lips end rather far into the head, around vertically down from where the eyes end. This fixed my three-quarters view problem and I was happy. (The moral of the story is to get to know people by going to lunch with them so they tell you how to fix your model :))

Right now I am fixing my texture because I realized rather late into the process that I put the eyebrows too high. I will post the update soon.
Monday, November 26, 2012

VFX Videos

I think it is high time for me to post some VFX videos in this blog. For the moment, I have only videos I created for student exercise when I was a part-time Basic VFX instructor at CG Protege.

First, a video to demonstrate material and volume light animation:

My goal with this video was to test the students' understanding of material. Rather than just giving them a simple material exercise, I threw in volume light to get them off balance a little (which seems to happen a lot to me in production). Elements in the video:
  1. Animated procedural texture,
  2. Animated volume light.
The video was rendered using 3ds Max scanline renderer without any compositing. The reason being the class had not reached compositing yet.

Second, a video that combines almost all elements introduced in the class:
At the time I created this video, the students were about to go through their first project. I intended this exercise to help them prepare for the project. Here are the elements in the video:
  1. A simple geometry with animated texture for the energy bullet,
  2. Particle system for the debris,
  3. Light pass & volume light look & timing,
  4. Extra texture for the block for the hit mark.
This video was also rendered using 3ds Max scanline renderer with no compositing. The glow on the energy bullet was done using 3ds Max's render effect.

I will post more videos (hopefully from Dream Defenders) soon.

Sunday, October 21, 2012

ZBrush Practice: Simple Head

Apologies for neglecting to post my progress with the ZBrush sculpting class I am attending. The class is conducted by Dmitry Gaborak at CG Protege; the goal of the class is to eventually model a full body human character. For now, the classes focus on the human head.

After studying the human skull, the class continued with simple head. So why start with the skull rather than going straight to a simple head? Because by starting with the skull, we are forced to see the structure of the skull and see which bones contribute to the shape of the head.

I personally found starting with the skull very helpful. I have studied the human head for drawing a lot of times, and I sort of memorized the shape of the head. What I missed is perhaps the understanding of the shape of the skull.

Figure 1. Simple head sculpted during class
Figure 1 shows the model I sculpted during class. I took around 2 hours (I did not note down the time). We started with a polysphere (a rounded cube), applying DynaMesh when necessary.

Dmitry made us follow a selection of steps presented in Burne Hogarth's Drawing the Human Head book. The first step is really simple, basically a round shape for the cranium and a box for the jaw. I thought it was too simple and in some ways negated our exercise with the skull in the previous class; but I was surprised to find myself struggling a lot with the first step. As figure 1 shows, I could not get the shape of the top and back part of the skull right.

When it became clear to me that the class was really going through a series of simplifications which got more and more complex with each step, I could not salvage the model I worked on. I decided that I would follow through with what I got and would revisit the steps on my own after class.

Figure 2. Simple head sculpted after class
Figure 2 shows the outcome. Again, I did not note down that time I took, but it was extremely long. I started from a polysphere, taking my time to get shape and proportions right. It is worth noting Dmitry's tip for this class: check the shape of the eye socket from three quarter views, both the front (second from the left on figure 2) and the back (right most on figure 2). I personally check these views myself because they are the angles I often draw.

Figure 3. Simple head with eyelids
I then added simple eyelids and nostrils to the model. The result is figure 3.

So, here are points I concluded from this exercise:
  • At the back, the boundary between the bottom of the skull and the top of the neck is vertically around half way the head's height. (This is roughly the same height as the base of the nose.)
  • The bone that frames an eye is a landmark. (By landmark, I mean a prominent shape that serves as am important guide to get proportions right. I got this term from a life drawing class at CG Protege. I do not know if this is a generally accepted term in drawing & sculpting.)
  • The cheek bone is another landmark.
  • The nasal bridge is a potential landmark. In some cases it is not important; in others it means a lot.
  • Going front to back, the head is the widest around where the ear is. The face is narrower in comparison.
In addition, this exercise convinced me to take the time to go through whatever the class went through at least one more time on my own. I guess repetition is a part of exercise :)

Saturday, September 22, 2012

ZBrush Practice: Human Skull

I am attending a ZBrush sculpting class conducted by Dmitry Gaborak at CG Protege. The goal of the class is to sculpt a full-body character. As a starter, though, the class concentrates on the human head first.

Last week's lesson was about the human skull. Dmitry gave us a series of skull turn-table images as reference and we sculpt the skull from a polysphere (basically a rounded cube). We began by sculpting the major shapes, then used ZBrush's DynaMesh to get a better topology. After that it's up to us to sculpt the details.

I spent around 3 extra hours at home to continue working on my skull model. It turned out rather well, so I am posting it here.

The model is still relatively coarse, as you can see on the teeth. Also, the cheek bone shape is still off (I cannot yet spot what is off right now, I'm hoping I can see it with fresh eyes later).

Wednesday, July 11, 2012

Dreams Come True

That's the name of a band this post is about.

I bumped into them from a thread at OCRemix forum. The bassist, Masato Nakamura, composed the music for the games Sonic the Hedgehog 1 & 2 for Sega Genesis.

I guess he took short melodies from tunes he had in mind and expanded them to be the music for the Sonic games. However, the song linked from the OCRemix forum, called Sweet Sweet Sweet, sounds almost the same (if not exactly the same) as the ending for Sonic 2. I happened to play Sonic games a lot, so listening to the song felt like something major to me. A new piece related to my past. The song got me teary-eyed a little. Just a little!

Friday, July 06, 2012

2012 Update

After more than a year of hiatus, I decided it is time to resume writing for this blog.

There are many reasons to this. Work schedule finally stabilizes so I can allocate time for my interest outside work. I had a magical holiday week with my family so I felt the urge to resume writing down my thoughts. I helped a little with a social network marketing at work (please visit the Dream Defenders blog & Facebook page). Plus, Patrick started working at CG Protege and rekindled my interest in group projects.

So, an update is in order. I am now working as a VFX (visual effects) artist at Tiny Island Productions. Last year (and a little portion of this year) I was involved in the production for a Ben 10 tv film, Destroy All Aliens (the film in turn gave me a page at IMDB). Now we are working on Tiny Island's original series, Dream Defenders. In addition, I am helping out with VFX class at CG Protege (our school next door to our production studio).

Being a class instructor gave me the opportunity to explore things outside the usual things I do during production. Even when the class is about a simulation tool I use at work (FumeFX, for example), I can try out values and parameters that I had never paid attention to before. It has that boundary feel between experimentation and repeating steps I am familiar with. Sometimes trying reveals something completely new; though most of the times it turns out less than spectacular :p

So, here I am. I plan to write my thoughts about VFX work for animation. Soon. Maybe. If we are lucky.